 Save Pin
 My daughter came home from school with a construction paper bunny taped to her backpack, and suddenly our kitchen needed to become an Easter garden. She wanted something that looked like a real garden but tasted like chocolate, which felt like an impossible task until I remembered those layered dirt cups from a potluck years ago. The best part? No oven required, just a bowl, some pudding mix, and the kind of decorating chaos that makes kids actually want to help in the kitchen.
Last spring when my nephew wouldn't stop fidgeting through dinner, I set these little cups in front of him and watched his entire face light up. He actually asked if the "dirt" was real before diving in, and somehow that simple moment of wonder made the whole meal feel special. Everyone at the table wanted one, even the adults pretending they were too cool for bunny decorations.
Ingredients
- Instant chocolate pudding mix (3.4 oz, 1 box): This is your foundation, and honestly, the instant version works better here than homemade because it sets quickly and holds its shape in layers without getting watery.
- Cold whole milk (2 cups): Don't skip the cold part or use warm milk thinking it'll blend faster, because lumpy pudding ruins the whole vibe.
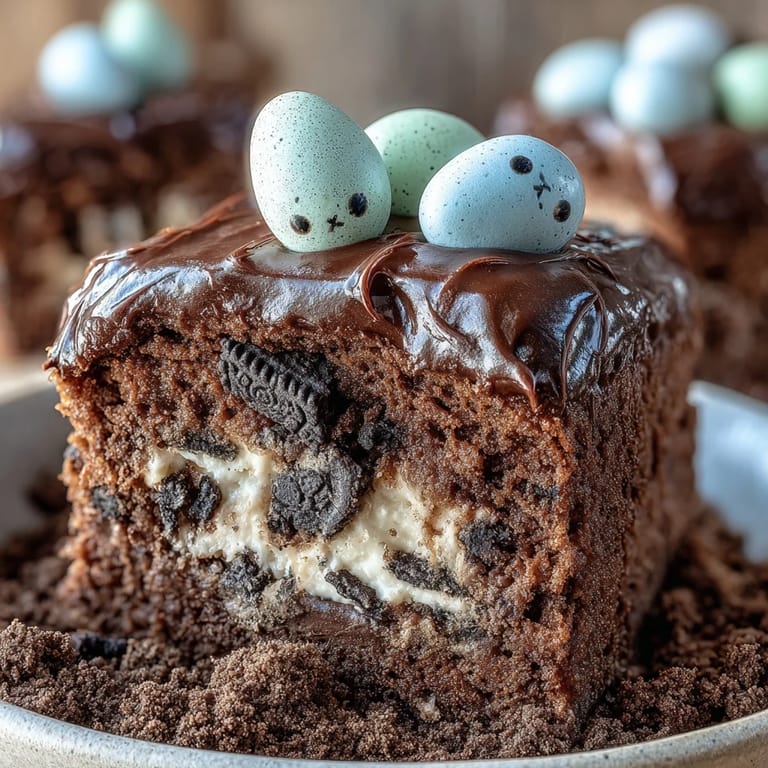
- Oreo cookies (18 regular or golden): Golden ones look prettier as "dirt," but regular cookies taste slightly richer and my kids prefer the darker color anyway.
- Whipped topping (1 cup): Cool Whip from the freezer aisle is reliable, though homemade whipped cream feels fancier and tastes fresher if you have time.
- Marshmallow bunny candies or chocolate bunnies (6-12): Peeps are traditional and come in pastel colors, but literally any Easter candy works here depending on what you find or what the kids already have stashed away.
- Pastel-colored sprinkles (1/4 cup): These make the whole thing look intentionally festive instead of just assembled, so don't skip them even if you think they're unnecessary.
- Mini candy eggs (1/3 cup, optional): The optional decorations are where you get creative, so use what feels right for your Easter vibe.
- Mint sprigs (6 small, optional): Fresh mint actually smells like spring and makes people think you're more thoughtful than you probably are about this dessert.
Tired of Takeout? 🥡
Get 10 meals you can make faster than delivery arrives. Seriously.
One email. No spam. Unsubscribe anytime.
Instructions
- Whisk the pudding into submission:
- Pour your pudding mix into a bowl with cold milk and whisk hard for about 2 minutes until it thickens enough to coat the back of a spoon. Let it sit for 5 minutes while you take a breath, because it'll continue setting and become the perfect texture.
- Crush the cookies into edible dirt:
- Throw your Oreos into a food processor and pulse until you have fine crumbs that actually look like chocolate soil, or seal them in a zip-top bag and let out some stress with a rolling pin. Either way works, but the food processor is faster and your wrists will thank you.
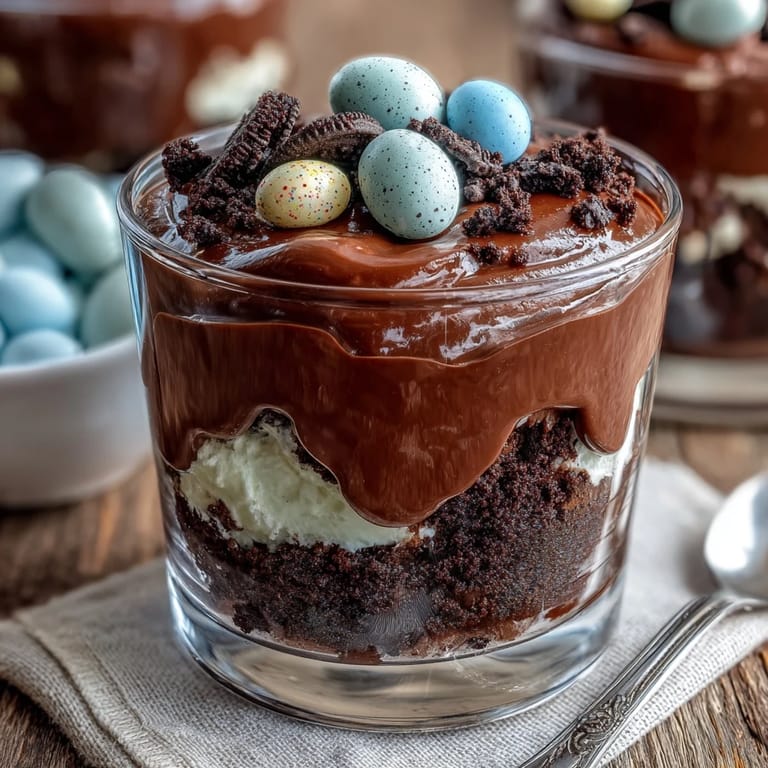
- Build the bottom layer:
- Spoon about 2 tablespoons of crushed Oreos into the bottom of each clear cup, pressing down gently so they form a little bed. The clear cups matter here because people want to see the layers you worked to create.
- Add the pudding foundation:
- Divide your chocolate pudding evenly among the six cups, spooning it carefully on top of the cookie layer. This is where the dessert starts looking intentional instead of random.
- Create the top dirt layer:
- Sprinkle another 2 tablespoons of crushed Oreos over each pudding layer to make it look like the pudding is buried under actual garden dirt. This layer is both delicious and totally commits to the bit.
- Add the fluffy clouds:
- Top each cup with a generous dollop of whipped topping in the center, either spooned on or piped if you want to feel fancy. This white cloud is where your bunny is supposedly hiding, so make it look inviting.
- Decorate like you're creating edible art:
- Arrange your bunny candies, sprinkles, mini eggs, and mint sprigs on top of each cup however feels right to you. This is the moment where the whole thing becomes a spring garden instead of just a layered dessert, so have fun with it.
- Chill or serve immediately:
- These can go straight to the table if you're hungry, or live in the fridge until you need them, though they're best eaten within 24 hours before the cookies start absorbing moisture and losing their crunch.
 Save Pin
 There's something about watching someone's face when they realize the "dirt" in a dessert is actually just crushed cookies that never gets old. My nephew used a tiny spoon to excavate his cup like he was on an archaeological dig, and suddenly Easter dinner became the highlight of his week instead of just another family obligation.
Making This Your Own
The beauty of these cups is that they're a base for whatever Easter decorations you already have on hand. If you found chocolate bunnies instead of marshmallow ones, use them. If you're out of mint sprigs, crushed chocolate Easter eggs work just as well. This is one of those recipes where following the instructions exactly matters less than following your instincts about what makes spring taste good to you.
Flavor Variations Worth Trying
Once you nail the chocolate version, you realize you can swap the pudding flavor entirely. Pistachio pudding with green sprinkles makes a different kind of garden vibe, and vanilla pudding topped with crushed vanilla wafers becomes something closer to a deconstructed cheesecake. The layer structure stays the same, so you're really just playing with flavors while keeping the assembly foolproof.
Timing and Storage Tips
These cups are forgiving in some ways and particular in others, which is a good metaphor for Easter dinner itself. You can assemble them up to three hours ahead without the cookies getting too soft, and they actually taste best when served cold straight from the fridge. The whipped topping stays light and fluffy better when everything's chilled, and the pudding sets up firm enough to actually taste like a real dessert instead of pudding soup.
- Make the pudding first, let it set properly for those full 5 minutes, or it'll be too loose to layer nicely.
- Crush extra cookies just in case you want to add more than the recipe calls for, because restraint is hard when something looks this good.
- Store these in the fridge and eat them within 24 hours, because by day two the cookies have basically become soggy sponges.
 Save Pin
 Easter desserts don't need to be complicated to feel special, and these cups prove that sometimes the simplest recipes create the best memories. Make them with whoever's around, let the decorating be messy, and watch people smile when they see their garden on a spoon.
Recipe FAQs
- → How do I prepare the chocolate pudding layer?
Whisk instant chocolate pudding mix with cold whole milk for 2 minutes, then let it set for 5 minutes until thickened.
- → What can I use to crush the cookies?
Crush Oreos using a food processor or place them in a zip-top bag and use a rolling pin to break them into fine crumbs.
- → Can I make a gluten-free version?
Yes, substitute regular Oreos with gluten-free sandwich cookies to accommodate gluten sensitivities.
- → How should I decorate for an Easter theme?
Top with marshmallow or chocolate bunny candies, pastel sprinkles, mini candy eggs, and mint sprigs to create a festive garden effect.
- → How long can these cups be stored?
Best enjoyed within 24 hours to maintain texture and freshness. Keep refrigerated until serving.